Using IBM Worklight its become more easy for developer to create hybrid application for cross-platforms, Where platform dependent feature like Push Notification, Storage etc are available to inject over hybrid application. This post entry is targeting to achieve push notification using Worklight, although there are many online article are already written on this topic and IBM Information Center is full of it but none of them are specific to Android device and so decided, to share this meal to have your day.
Following diagram illustrates the push notification architecture that simplifies sending push message across multiple devices running on different platforms. It provides a central management console to manage the mobile vendor services, e.g. APNS and GCM, in the background.
Following diagram illustrates the push notification architecture that simplifies sending push message across multiple devices running on different platforms. It provides a central management console to manage the mobile vendor services, e.g. APNS and GCM, in the background.

Now it’s time to implement and check this functionality on emulator, and to simulate this concept on real device or emulator. I recommend to use download push notification sample code provided by IBM on their get started tutorial and sample section on IBM Worklight Information Center:
The sample code available under the Advanced section with name Module 41 - Push Notifications OR use the below URL to download push notification sample code.
Once you downloaded the code please follow these step to configure and test this app on emulator.
- Open the Worklight Studio OR eclipse and use the File Menu and select Import option will open the window.
- Now Select General | Existing Projects into Workspace and press Next.
- In the next Import Project window select and browse archive file as shown in the following image and Click Finish.
- If Android environment is already added then no need to add android environment, if it doesn’t then add android environment into this project.

- Now open the application-descriptor.xml under the path apps | PushApplication you’ll see pushSender tag under the android tag. There are two values required one is API key and another one is GCM sender ID.

- To add these value use the following steps.
- Open the Google Cloud Message Service by using this URL http://developer.android.com/google/gcm/gs.html and follow Creating a Google API project steps under the shared URL.
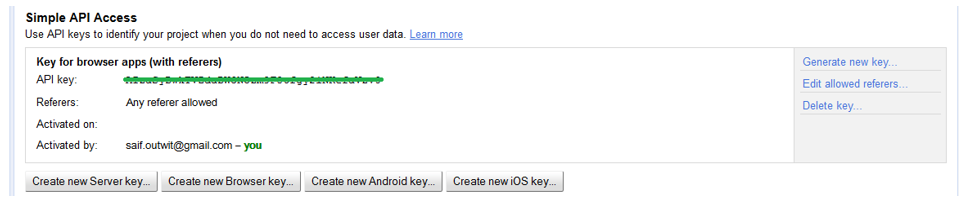
- Once your project and enabling GCM service is done you’ll have the project number which we use for GCM sender ID. So now we have Sender ID and to generate the API key (second required value) open the dashboard for recent created project as shown in following image.

- Now simply copy this API key and paste it under required API key attribute and then build and deploy this project will create the android project automatically under the same eclipse.
- Before run this app on emulator make sure adapter must be deployed on Worklight server as this example has PushAdapter under adapters folder and the emulator must target Google API.

- If everything accordingly you’ll have first screen with asking username and password. You can use any username (you must remember the username) and password to bypass this screen using login button will show you the following image with multiple buttons.

a. Before subscribe please verify the emulator version for push support and check if username you used is already subscribed.
b. Device configuration and event subscription is done. To send the notification from server we use the adapter so right click on PushAdapter and Run As | invoke Worklight Procedure and finally call the submitNotification procedure with two required parameters; username and notification text passing in the following image.

Finally After type your message click on Run to send this message. Within few second you’ll have notification on your emulator similar to following images.

